Now that you've found a picture, what do you do with it? Most of the time you will want to save it, print it out, or both. You'll also need to give credit to the original author or creator.
Saving | Printing | Citing Sources
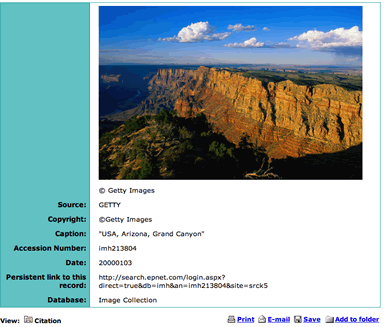
Here is our photo of the Grand Canyon.
Saving an Image
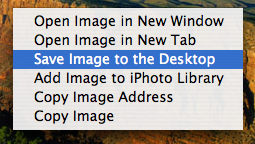
- Right click on the picture (click the button on the right hand side of your mouse). A menu will appear.
Choose Save Image to the Desktop or Save Image As. If your computer uses Save Image As, name it something that will give you a clue about what is in the file, like grandcanyon.
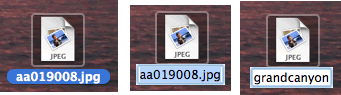
- Find the file on your computer screen. If your computer uses Save Image to the Desktop, its name will probably be a bunch of letters and numbers. For example, the name of the Grand Canyon file is aa019008.jpg. This name doesn't give any clues about the picture in the file, so you will want to rename it.
To rename a file, click on the name. It should change color. Type the a new name that describes the picture, in this case maybe grandcanyon.
- If you want to use the picture in PowerPoint, drag it onto your slide.
- Before you leave the computer, move the file to your locker. Now it will be ready to use from any computer in the school.
Printing an Image
There are three ways to print our picture of the Grand Canyon.
- Print from the file you just saved
- Print using the print button in the database
- Print from the web browser
Printing from a File
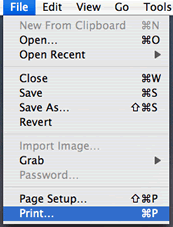
- Open the file by double clicking on it. It will open in an image viewer.
From the menu bar at the top of the screen, click on File and choose Print from the menu.
- A print box should pop up. Click on the Print button.
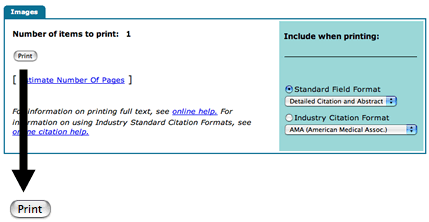
Printing from the Database
- Click on a Print button. There are two, one at the top of the page and one at the
bottom.

- A print instructions page will open. Click on the Print button.
Printing from the Web Browser
A web browser is the software you use to look at web pages.
Using the menu bar at the top of your screen, click on File and choose Print from the menu.
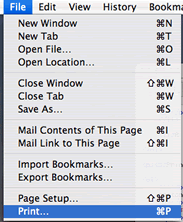
- A print box should pop up. Click on the Print button.
Citing Sources
When you use an image (or anything else) that was created by someone else, you must give them credit for it. You will need the following information to create a citation for your bibliography:
- Creator or owner of the image
- Title of the image, if there is one
- Name of the database where you found it
- URL (website address) of the database
- Date you saved it
Let's create a citation for the Grand Canyon picture. We can find most of the information we need
on this page.
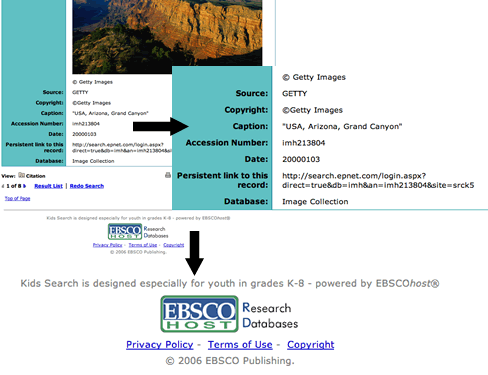
- The owner (or source) of this image is Getty Images. Copyright means they own the rights to the photo.
- The title of the photo is the caption: "USA, Arizona, Grand Canyon".
- The database we are using is called the Image Collection. It is owned by a company called EBSCO.
- The web address we used to get here is the URL for INSPIRE, which is http://www.inspire.net.
- All that's left is today's date.
Let's put it all together.
Getty Images. "USA, Arizona, Grand Canyon." EBSCO Image Collection. Accessed through http://www.inspire.net on June 7, 2006.
This is just one way to cite this source. There are others that would also be correct. The most important thing is to give credit to the owner or creator and tell where you got it. Your teacher or library media specialist will give you the rules they expect you to follow when making citations.